Deepin Cloud Print
Overview
Deepin Cloud Print is a new printing solution developed by Wuhan Deepin Technology Co., Ltd.. It will connect your printer to the network, and is enabled for network printing via daily used applications. Deepin Cloud Print is suitable for desktops, laptops, some tablets and other networking devices that you have authorized to print.
Deepin Cloud Print is NOT opensourced. The copyright belongs to Wuhan Deepin Technology Co., Ltd..
Deepin Cloud Print consists of Server (in Windows) and Client (in GXDE), which will be configured respectively.
Server Configurations
You can install the application program for Deepin Cloud Print Server and configure the authorization code in Windows.
Install Deepin Cloud Print
- Download the installation program for Deepin Cloud Print ServerDownload Link.
- Install in Windows.
- Finish the installation by wizard.
Set The Authorization Code
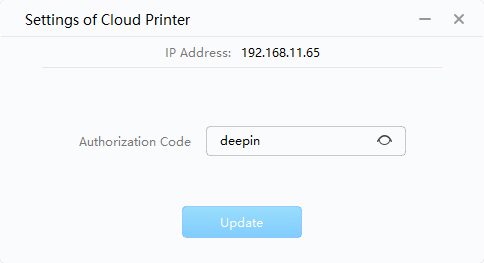
The server IP address will be acquired in Windows automatically after finished the installation, then you can set the authorization code.
: If you need to change the authorization code, please input a new one in the textbox, and then click on Update.
- Click the start menu to open the program of Deepin Cloud Print Server in Windows.
- Acquire the IP address automatically.
- Input the authorization code in the settings interface of Deepin Cloud Print Server.
- Click on Update, then
 will be displayed.
 - After updated the authorization code,
will be displayed.

Client Configurations
You can open Deepin Cloud Print Client in deepin to add one or more cloud printers.
Open Deepin Cloud Print
- Click on
to enter launcher.
- Click on
to enter the interface of Deepin Cloud Print.
Set Deepin Cloud Print
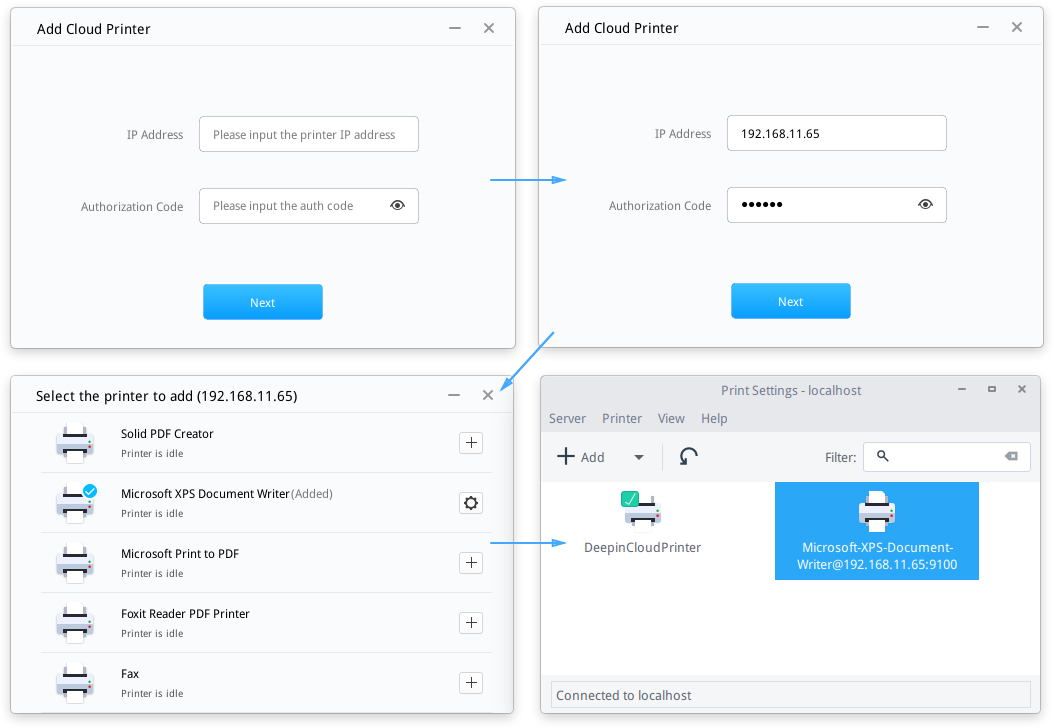
- On the interface of Deepin Cloud Print, input the IP address and authorization code of Deepin Cloud Print Server from Windows.
- Click on
to show all printers from Windows.
- Click on
to add the printer, and then its status will be displayed in "Added".
- Click on
to enter the interface of print settings.
- You can view whether the printer is added successfully.

: If you need to delete the printer, please enter "Print Settings" to select the printer, then select Delete in the context menu.
Print Test
You can use cloud print to print files in deepin, taking .doc files as the example.
- Open .doc files by WPS.
- Click on Writer on the top left corner.
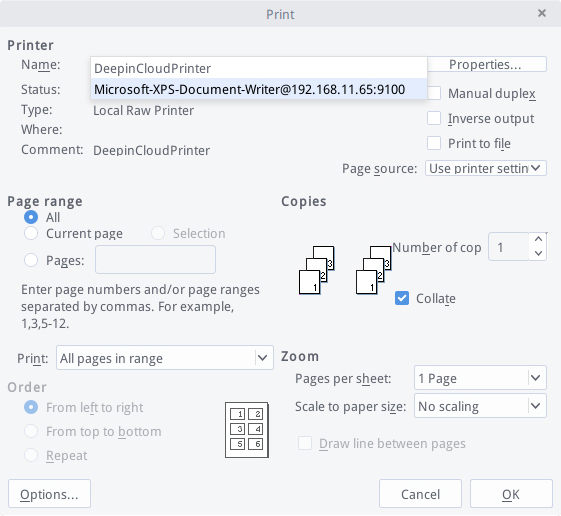
- Select Print to enter the interface of print settings.
- Select the printer in the pull-down option of Name, and set other print parameters.
- Click on OK.

: If authorization code has been updated in Windows, when you are printing a file, there will be a prompt of "The authorization code of cloud print server has been updated, please input a new authorization code". Please contact the administrator to get the new one to print. If errors occurred during printing, please reset according to the errors.
